
React笔记
React A JavaScript library for building user interfaces
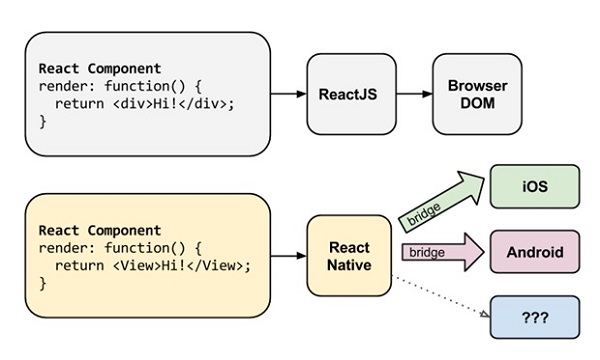
React Native Learn once, write anywhere: Build mobile apps with React
目录
1. 环境配置
1. 安装:
sudo apt install node.js npm
# react-native
sudo npm install -g react-native-cli

# Looks like you installed react-native globally, maybe you meant react-native-cli
# 彻底卸载错误安装的 react-native
sudo npm uninstall -g react-native
sudo rm /usr/local/bin/react-native
2. 远程开发React
1. 直接通过SSH远程登录
2. 本地开发远程运行
-
代码编写
编辑器 插件 Atom编辑器 remote-sync VSCode FTP-Sync remote-sync配置
 {
   "uploadOnSave": true,
   "useAtomicWrites": false,
   "deleteLocal": false,
   "hostname": ${IP},
   "port": "22",
   "target": ${PATH},
   "ignore": [
     "\\.git/**",
     "\\.svn/**",
     "node_modules/**",
     "vscode/**",
     "dist/**",
     "cfg/**"
   ],
   "username": ${username},
   "password": ${password},
   "watch": [
     "/src"
   ],
   "transport": "scp"
 }
FTP-Sync配置
{ "remotePath": ${PATH}, "host": ${IP}, "username": ${username}, "password": ${password}, "port": 22, "secure": false, "protocol": "sftp", "uploadOnSave": true, "passive": false, "debug": false, "privateKeyPath": null, "passphrase": null, "ignore": [ "\\.vscode", "\\.git", "\\.svn", "\\.DS_Store", ".dist/", ".externalToolBuilders", ".project", ".settings", "node_modules" ], "generatedFiles": { "uploadOnSave": false, "extensionsToInclude": [], "path": "" } } -
运行
 sudo npm install webpack-dev-server -g
 webpack-dev-server --host ${IP} --port 8000 --content-base ${SRC_DIR}
2. 新建项目
npm initnpm install
1. generator-react-webpack
1. 安装
npm install -g yo
npm install -g generator-react-webpack
2. 创建项目
# Create a new directory, and `cd` into it:
mkdir my-new-project && cd my-new-project

# Run the generator
yo react-webpack
3. 集成typescript
npm install --save-dev @types/react @types/react-dom
npm install --save-dev typescript awesome-typescript-loader source-map-loader
tsconfig.json:
{
    "compilerOptions": {
        "outDir": "./dist/",
        "sourceMap": true,
        "noImplicitAny": true,
        "module": "commonjs",
        "target": "es6",
        "jsx": "react",
        "allowJs": true
    },
    "include": [
        "./src/**/*"
    ],
    "awesomeTypescriptLoaderOptions": {
        "useBabel": true,
        "useCache": true
    }
}
webpack.config.js:
module.exports = {
    entry: "./src/index.tsx",
    output: {
        filename: "bundle.js",
        path: __dirname + "/dist"
    },

    // Enable sourcemaps for debugging webpack's output.
    devtool: "source-map",

    resolve: {
        // Add '.ts' and '.tsx' as resolvable extensions.
        extensions: [".ts", ".tsx", ".js", ".json"]
    },

    module: {
        rules: [
            // All files with a '.ts' or '.tsx' extension will be handled by 'awesome-typescript-loader'.
            { test: /\.tsx?$/, loader: "awesome-typescript-loader" },

            // All output '.js' files will have any sourcemaps re-processed by 'source-map-loader'.
            { enforce: "pre", test: /\.js$/, loader: "source-map-loader" }
        ]
    },

    // When importing a module whose path matches one of the following, just
    // assume a corresponding global variable exists and use that instead.
    // This is important because it allows us to avoid bundling all of our
    // dependencies, which allows browsers to cache those libraries between builds.
    externals: {
        "react": "React",
        "react-dom": "ReactDOM"
    },
};
4. 添加airbnb-eslint代码检查
eslint-config-airbnb
Our default export contains all of our ESLint rules, including ECMAScript 6+ and React. It requires eslint, eslint-plugin-import, eslint-plugin-react, and eslint-plugin-jsx-a11y.
- Install the correct versions of each package, which are listed by the command:
npm info "eslint-config-airbnb@latest" peerDependencies
Linux/OSX users can run
(
  export PKG=eslint-config-airbnb;
  npm info "$PKG@latest" peerDependencies --json | command sed 's/[\{\},]//g ; s/: /@/g' | xargs npm install --save-dev "$PKG@latest"
)
Which produces and runs a command like:
npm install --save-dev eslint-config-airbnb eslint@^#.#.# eslint-plugin-jsx-a11y@^#.#.# eslint-plugin-import@^#.#.# eslint-plugin-react@^#.#.#
Windows users can either install all the peer dependencies manually, or use the install-peerdeps cli tool.
npm install -g install-peerdeps
install-peerdeps --dev eslint-config-airbnb
The cli will produce and run a command like:
npm install --save-dev eslint-config-airbnb eslint@^#.#.# eslint-plugin-jsx-a11y@^#.#.# eslint-plugin-import@^#.#.# eslint-plugin-react@^#.#.#
Add "extends": "airbnb" to your .eslintrc
config:
{
  "parser": "babel-eslint",
  "extends": "airbnb",
  "env": {
    "browser": true,
    "node": true,
    "mocha": true
  },
  "globals": {
    "Babel": true,
    "React": true
  },
  "plugins": [
    "react"
  ],
  "rules": {
    "global-require": "off",
    "import/no-unresolved": "off",
    "no-underscore-dangle": "off",
    "no-new-func": "off",
    "no-param-reassign": "off",
    "react/prefer-stateless-function": "off",
    "react/no-multi-comp": "off",
    "react/jsx-no-bind": "off",
    "react/jsx-indent": "off",
    "react/jsx-first-prop-new-line": "off",
    "react/jsx-filename-extension": "off",
    "no-restricted-syntax": "off",
    "comma-dangle": ["error", "never"]
  }
}
3. 常用概念
NOTE: 代码和说明按照ES6规范,配图等为ES5规范。
class Comment extends React.Component {
    render() {
        return (
            <div>
                <div className="comment-body">
                    {this.props.children}
                </div>
                <div className="comment-author">
                    - {this.props.author}
                </div>
            </div>
        );
    }
}

React.render(
    <Comment author="cofcool">cofcool.net</Comment>,
    document.getElementById('content')
);
1. 组件
React 应用都是构建在组件之上。 props是组件包含的两个核心概念之一,另一个是state, props是组件的配置属性,在组件内部是不变的,只是在调用这个组件的时候传入不同的属性(比如这里的author)来定制显示这个组件;state可以存储组件的状态等信息,可根据需求动态的修改。在数据绑定的时候,应该让组件尽可能地少改变状态,这样组件逻辑就容易维护。对于需要初始化的状态数据。应在constructor方法中使用this.state = ({key: value});的方式来初始化(ES6)。
组件生命周期(ES6中有所改变):

2. JSX
从上面的代码可以看到将HTML直接嵌入了JS代码里面,这个就是React提出的一种叫JSX的语法。
3. Virtual DOM
当组件状态state有更改的时候,React会自动调用组件的 render 方法重新渲染整个组件的UI。当然如果真的这样大面积的操作 DOM,性能会是一个很大的问题,所以 React 实现了一个虚拟DOM,组件 DOM 结构就是映射到这个虚拟 DOM 上,React 在这个虚拟 DOM 上实现了一个 diff 算法,当要更新组件的时 候,会通过 diff 寻找到要变更的 DOM 节点,再把这个修改更新到浏览器实际的 DOM 节点上,所以实际上不是 真的渲染整个 DOM 树。这个虚拟 DOM 是一个纯粹的 JS 数据结构,所以性能会比原生 DOM 快很多。
4. Data Flow
单向数据绑定是 React 推崇的一种应用架构的方式。
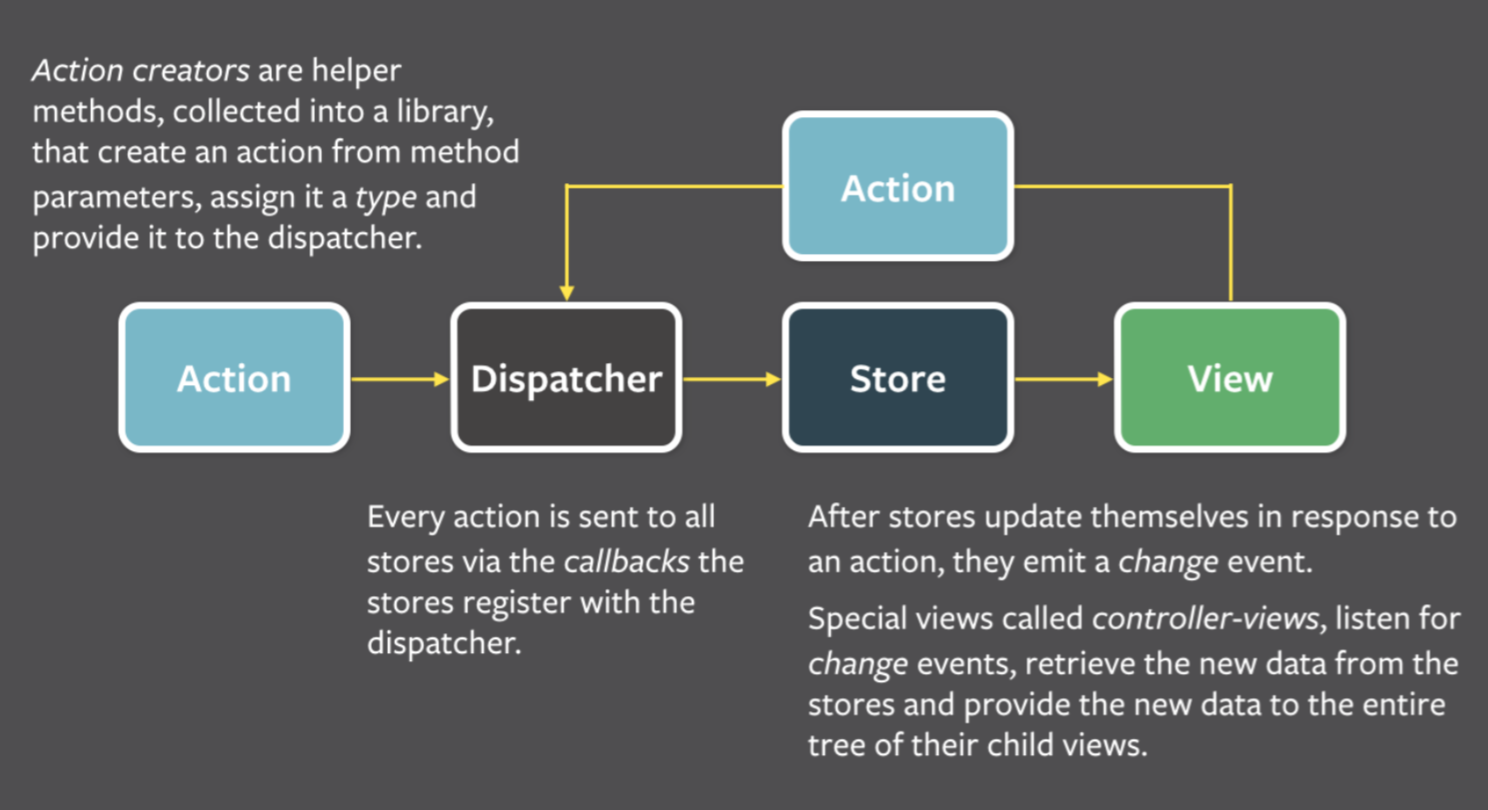
5. Flux
6. webpack
模块加载器,项目打包工具。
webpack takes modules with dependencies and generates static assets representing those modules.

generator-react-webpack初始化项目:
 # Make sure both is installed globally
npm install -g yo
npm install -g generator-react-webpack

 # Create a new directory, and `cd` into it:
mkdir my-new-project && cd my-new-project

 # Run the generator
yo react-webpack
7. CSS Modules
Webpack为例,需要style-loader,css-loader。
- 局部作用域
通过
module来引用对应的style,打包工具会把类名编译为一个唯一的hash字符串,这样就不会出现重复引用或是冲突。// test.js import React from 'react'; import style from './style.css'; export default () => { return ( <div className={style.test}> test </div> ); }; // style.css .test { color: yellow; } // 等同于 :local(.test) { color: yellow; } // result <div class="bKF54kqbom2MXavZczLM4">test</div> //head <style type="text/css">.bKF54kqbom2MXavZczLM4 { color: yellow; } </style> - 全局作用域
可以使用
:global(.className)来声明一个全局class,这样可以直接通过className来直接引用该类,而且类名不会被编译成哈希字符串。
4. 常用组件
- antd
- redux-form-utils
- redux-form
5. 源码解读
6. 浅谈Flux
7. 浅谈Redux
8. 常见问题
1. 文件过多时,npm start失败
错误信息:
Loading dependency graph...2017-08-04 13:14 node[5010] (FSEvents.framework) FSEventStreamStart: register_with_server: ERROR: f2d_register_rpc() => (null) (-22)
2017-08-04 13:14 node[5010] (FSEvents.framework) FSEventStreamStart: register_with_server: ERROR: f2d_register_rpc() => (null) (-22)
2017-08-04 13:14 node[5010] (FSEvents.framework) FSEventStreamStart: register_with_server: ERROR: f2d_register_rpc() => (null) (-22)
 ERROR  Error watching file for changes: EMFILE
{"code":"EMFILE","errno":"EMFILE","syscall":"Error watching file for changes:","filename":null}
Error: Error watching file for changes: EMFILE
    at exports._errnoException (util.js:1024:11)
    at FSEvent.FSWatcher._handle.onchange (fs.js:1359:9)
Loading dependency graph...npm ERR! code ELIFECYCLE
解决:
launchctl limit maxfiles
sudo launchctl limit maxfiles 2048 unlimited
- Clear watchman watches:
watchman watch-del-all. - Delete the
node_modulesfolder:rm -rf node_modules && npm install. - Reset packager cache:
rm -fr $TMPDIR/react-*ornpm start -- --reset-cache.
2. 使用Pods
3. webpack环境下,require中使用变量
在开发中有时需要在require函数中使用变量,可查看官方文档:dynamic requires。如果参数为变量,则需要确定该参数的值为模块的相对路径。webpack在监测到require中使用变量,则会根据把该值替换为正则表达式,根据匹配的结果生成一个map,模块路径为key,模块id为value,然后根据参数的值来获取指定模块。
示例:
require("./template/" + name + ".jade");

{
    "./table.jade": 22,
    "./table-row.jade": 23,
    "./directory/folder.jade": 24
}
4. TypeScriptReact环境下,报React refers to a UMD global, but the current file is a module.错误
引入React即可。
import * as React from 'react'
5. 分割过大文件
参考 webpack 插件 SplitChunksPlugin
6. UmiJs 根据不同环境激活对应配置
可以通过环境变量 UMI_ENV 区分不同环境来指定配置,如环境变量为local时的配置文件为 .umirc.local.js,参考 多环境多份配置,环境变量配置参考 环境变量
更新中….